|
Restoring
a "Mite" In January 2004 I began a search to find a Mooney "Mite". I had flown one in 1972 and remembered being very impressed with the flight characteristics and performance. (The 4 gph fuel consumption wasn't bad either.) I felt it would be a great "second" airplane. A search of available aircraft revealed that most had been restored 20 or so years ago and it would be very difficult to properly evaluate the wood structure without removing all the fabric. I was able to learn from the Mooney Mite Site that 283 Mites had been built and of these, the last model built, the C-55, had a larger cockpit and canopy. Only 35 of these were produced. I decided after sitting in a C-55 cockpit, that this was what I wanted. It was much more comfortable than the earlier models however, finding a C-55 looked like it would be nearly impossible. A Mite expert I had contacted happened to recall that there had been a C-55 stored many years ago in a garage, about 30 miles from where he lived in Western Ohio. He didn't know if it was still there, but remembered the owners name. Wow, I thought, the old "airplane in a barn" fable! I put on my detective hat and managed to locate the owner who said he had owned the airplane since 1965 and had used it to commute between his home in Southern California and Cleveland, Ohio (usually in two days) with in between trips to Seattle (a one day flight). In 1969 the original fabric tested unairworthy and the airplane was grounded. The owner had planned to restore it, and when he moved to Ohio in 1992, stored it in his garage. As the years passed, he began to realize that he would probably never complete the restoration. |
|
|
|
In our
phone conversation, he agreed to sell the airplane so I wasted no
time. I headed for Ohio, picked up my friend who had told me about
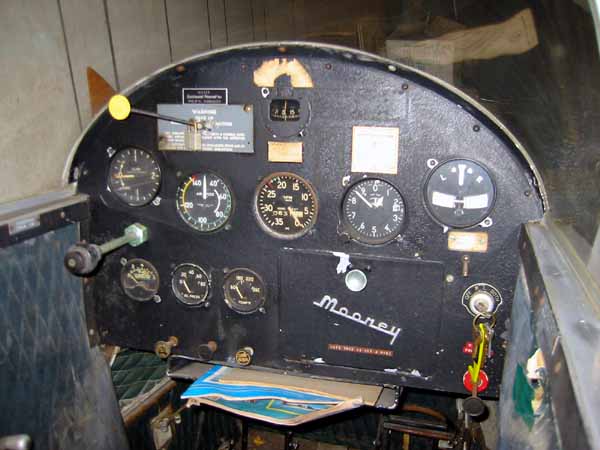
it, and found the airplane as pictured above. It still had the original
fabric and colors. The tail and wing were hanging from the ceiling
with tattered fabric. The wing had been wrapped in plastic sheets.
The logs were complete back to the first flight and nearly every
flight was recorded in detail. Total time was 831 hours. The original
panel pictured below needed lots of work. |
 |
| The owner had many pictures of the airplane when it was still flying such as the one below taken in 1966 at Cable Airport in California: |

|
|
By late
February 2004 the airplane arrived at my shop and the restoration
began. A jig was built to support the wing and the old fabric removed.
The wood was in unbelievably good condition for a 50 year old airplane.
Even the rubber stamped part numbers were visible on each piece
of wood. Nothing had any rot. I breathed a sigh of relief. The condition
of the wood was no doubt due to the careful indoor storage and spending
most of it's flying life in dry climates. I optimistically estimated
the airplane would fly before the end of 2005. Since I had little
aircraft woodworking experience, I decided to concentrate on the
mechanical part of the restoration first. |

|
|
The fuselage
was completely disassembled with photos taken of each piece to aid
in reassembly. All the metal parts were cleaned, inspected, and
powder or paint coated as appropriate. All the hardware was replaced.
Some Mites had a complete electrical system with a starter and generator.
This one did not. Continental had made a few A-65-12 engines, especially
for the Mite, that had provisions for the starter and generator.
I found one of these, had it overhauled with new "Millennium"
cylinders and a new light weight starter and alternator. A complete
electrical system was added including lights, a radio, transponder
and encoder. By May 2004, reassembly began. I had never done any
fabric work, but decided that covering the wooden tail cone would
be a good project to acquire the needed skills. The tail cone was
in near perfect condition and required very little repair work. |
 |
|
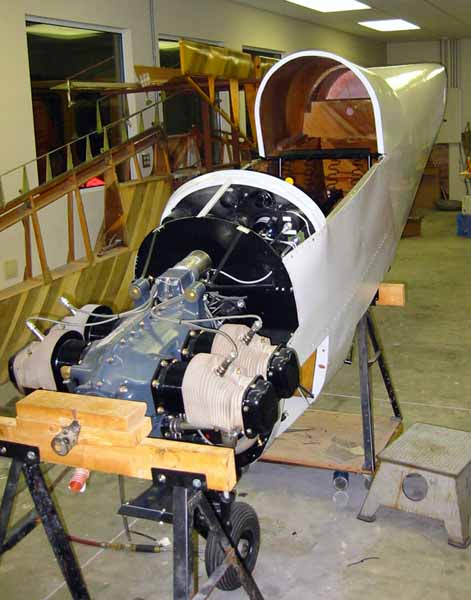
By December
2004, I had the engine and instrument panel installed, the tail
cone had been covered, and in January was mounted on the fuselage.
Instruments were installed and new "Tefzel" FAA approved
wiring was added for the electrical system using the original Mite
wiring prints. The fuel tank was cleaned, leak checked and reinstalled
along with the rest of the fuel plumbing. The landing gear was completely
disassembled, powder coated and installed with all new rubber shock
disks. |
 |
|
By April
2005, the fuselage was nearly finished. The windshield and canopy
were back on and the interior was being completed. Only problem
was the wing, control surfaces, flaps and tail that still needed
minor woodwork and covering were still lurking in the background.
I would be gone quite a bit over the summer and would not be able
to work on the project again until September 2005. So much for flying
the Mite before the years end. Judging by how long it took to cover
the tail cone, I estimated that it would take another year to cover
the rest of the airplane. I wanted to keep the momentum going over
the summer. |
 |
|
I had looked at a number of Mites and found many of them to have cosmetic deficiencies. Most common on the Mite were warped trailing edges of the control surfaces due to the light metal tube that formed the structure bending as the fabric was tightened. Many did not have straight tapes and many had uneven plywood surfaces due to improper preparation. Since I had never recovered anything but the tail cone, I had serious doubts about my ability to do a quality job without having to redo things several times. I wanted the finished airplane to look good. I confided my doubts in a friend who had lots of restoration experience. He asked if I had seen a recently restored Aeronca Chief that belonged to another mutual friend. I had not and he said the restoration was a beautiful job and had been done in nearby Weirsdale by a guy named Herb Clark. He thought quite a bit of Herb and suggested that I call him. The next day, Herb flew over in the Chief to look at my project. The fabric and paint on the Aeronca were beautiful. The whole airplane was quality. I was impressed. Herb looked over the Mite wing, control surfaces and tail. He said that he could cover them for me during the summer and have them finished when I was able to resume the project in September. He suggested that I visit his shop. I found the shop to be exceptionally clean and orderly. He had the equipment for doing nearly any type of metal, fabric, wood or paint work including a well lit spray booth which I lacked. We discussed the project.
Herb said he was in the 'happiness" business. His goal was
to deliver a quality product, when promised at the promised cost
and to have a happy customer when the job was finished. He said
that he would have my project finished by mid September. We agreed
on what was to be done and arrived at what I considered a fair
price. I reasoned that using Herbco would allow the airplane to
fly a year earlier than doing the job myself and would result
in a higher quality finished project due to Herb's covering and
painting skills. It would also keep the momentum going. I had
seen several other Mite restoration projects that were partially
finished and had stagnated or that had taken 10 or more years
to complete due to the distractions of life. The sooner the airplane
was finished, the more I'd be able to fly it. Next step was loading the wing and tail on a trailer and moving the job to Herbco. |

|
|
A thorough structural inspection of all components was completed by Herb. I found that one of the advantages of having the project at Herbco was the constant influx of visiting aircraft restorers and builders. Most of these folks live in one of the many fly in communities nearby and frequently visit Herbco as it is a "Mecca" In the area for Pitts and antique enthusiasts. Many of these folks are long time EAA'ers and have lots of experience with wood and fabric. The project was inspected many times over by very well qualified people. This added to my confidence. The Mite, as were all wooden airplanes of its day, was built with caisen glue. Each structural joint is reinforced with triangular wooden "glue" blocks. We attempted to remove each of these blocks. On a few, the bond was like new. Others could be pried loose. Herb replaced all the glue blocks that could be removed and replaced them with new blocks using modern glue to make the wing even stronger than when manufactured. We were surprised that Mooney had used little varnish to protect the wooden structure. The old style varnish was easily flaked off. Since the wing was to be covered using the PolyFiber process, all wooden components were given two coats of special two part epoxy varnish per the STC to seal against moisture entry. This stuff is far superior to the original because it won't flake off. I had coated the tail cone inside and out with the PolyFiber epoxy varnish to be sure moisture could not contact the wood. The wing trailing edge was slightly bowed from the old fabric, but was still structurally sound. Airplanes of the '40s and '50s were originally covered with linen and nitrate dope which continued to shrink over the years, bending the thinner parts. I had hoped to be able to remove the bow from the trailing edge by adding spacers in the bowed area. I didn't think it would be possible to replace it easily due to the complicated profile shape of the wood. Herb insisted on replacing it and easily milled out an exact duplicate from new sitka spruce. Had he not done this, I'm sure the bow would have looked really bad. Note the new wood along the trailing edge in the picture below. |
 |
| The control surfaces were recovered first and fitted to be sure the hinges were still in alignment. |
 |
| Next were the tail surfaces. Note how the PolyFiber epoxy fill was skillfully used to smooth the leading edge. |
 |
|
And then
the wing. |
 |
|
Below
is the wing in the spray booth for a coat of PolyTack. Herb kept
a steady stream of "progress" pictures in my email if
I was out of town. |
 |
| The tail is finished and temporarily assembled to insure that all parts fit properly. |
 |
| The wing is now complete down to the nonskid walk way. Flaps and ailerons have been installed. |
 |
| At last the components are back in my shop. The covering has taken less time than expected. The airplane is in the original factory markings. These have been cut from vinyl in case I want to later remove them for a more exotic paint scheme. It is now early September and time to begin final assembly. I guess Herb is happy, because I am. The job was done exactly as he promised. |
 |
| The panel and interior are now complete. |
 |
| The wing is ready to position. |
 |
| The fuselage is suspended and leveled, the wing has been positioned and leveled and in a few minutes will be mated together. |
 |
| The end of September 2005. The airplane is complete and ready for a final inspection. |
 |
 |
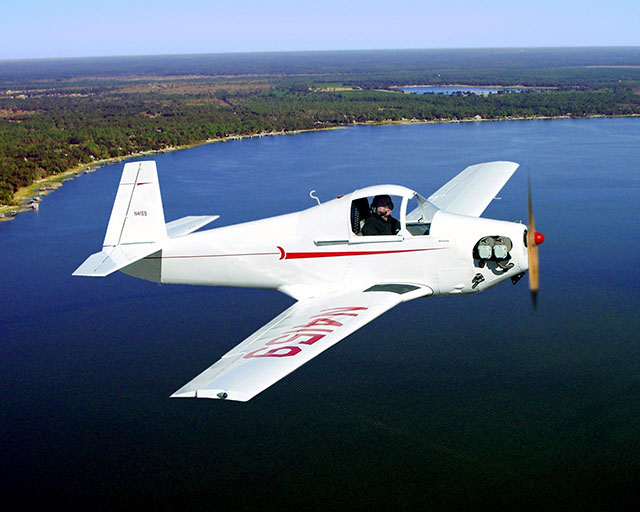
| October 6, 2005 - First flight of N4159 in 36 years - Almost 3 months ahead of schedule thanks to Herbco's help. The first flight was uneventful, performance was better than expected and all systems worked properly. The airplane is a delight to fly - docile and responsive with exceptional visibility and performance. |
 |
 |
