|
|
||
 |
||
|
||
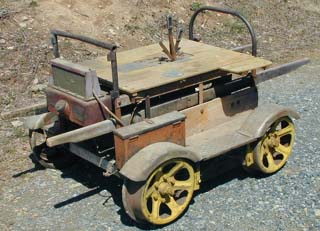
Fairmont M9 Z36 as found in Boone, NC |
The car was
complete and undamaged when found, but had not run in over 30 years. Since
it was narrow gauge with a frame only 42" wide, I was able to load it into
a van for the trip home to Florida. An attempt was made to start
the engine, but due to the deteriorated condition of the carburetor, it
would not fire.
The car was completely disassembled for a thorough inspection and cleaning. The axles had been cut and welded to 36" gauge so, in the interest of safety, I decided to replace them. New narrow gauge axles are available from Patrick "Smitty" Smith in Sedona, AZ or from Les King in Ohio. The engine was shipped to "Smitty" for a thorough inspection and repair. (Smitty was a great help and talked me through many small problems throughout the project.) The C-5 Carburetor went to Carey Boney in North Carolina. He is the Fairmont carburetor guru and completed a major overhaul at a very reasonable price. The engine had a steel hopper that Fairmont used during W.W.II because of aluminum shortages. |
|
| All steel parts
such as fenders and foot boards were glass bead blasted. Dents were removed
and the parts coated with an anti-rust primer. Aluminum parts were very
lightly bead blasted and treated with an acid etch to clean up any corrosion
that might not be detectable by visual inspection. Aluminum parts were
then alodined to seal them from future corrosion and primed.
The frame was assembled with a square to ensure that everything would be aligned and track straight. The original car used square headed bolts and split nuts which were reused after cleanup and bead blasting to keep the car as original as possible. This model M9 had no springs, but the axle bearings were the same as on other M9, M19 and MT19 cars. Bad bearings and races were replaced from stock by the local bearing store. They are not cheap, but are available. |
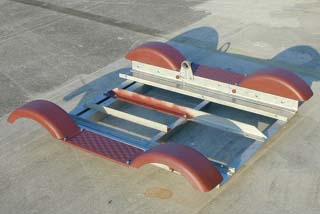
The frame is assembled and checked for proper alignment |
|
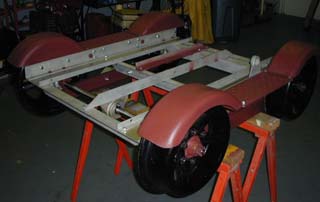
Once the upper frame is square, the axles and lower frame are installed |
The original
bearings on cars of this vintage ran in an oil bath (which is probably
why they were bad). Zerk style grease fittings were added to bring them
up to Fairmont specs for later cars. The new axles were fitted with insulating
cones (available from Les King) and were set to the proper gauge specs
from information in the Fairmont manual. The original 14" wheels were found
to be close to NARCOA wear limits so they were replaced with new ones available
from Harsco Track
Technologies.
The single conductor spark plug wire proved elusive as it is unlike current automotive types. The proper wire was located in a hot rod shop. The original rear axle pulley had a chunk missing. A new one was purchased from Dudley Newman at Newman Machinery in Phoenix. Dudley has a large supply of many parts and is very helpful. He is a good resource for anyone undertaking a restoration. Another good source of parts is Brown Railroad Equipment. |
|
| The
frame was primed with Corlar and painted with silver Imron paint. Imron
was chosen because I am most familiar with it's application. It is commonly
used in the aircraft industry and provides a very glossy hard finish. The
engine was then reassembled using a new gasket kit ordered from Fairmont
and mounted in the frame.
The old G-4598 belt was in poor condition and was replaced with a new one from Phil Gandy at Gandy Dancer Products (843) 383-0309. This new belt has performed very well. The Meter Gauge M9 as illustrated in the Fairmont catalogue used a duplicate of the rear hand rail in the front of the car. Such an arrangement might not comply with current NARCOA rules and certainly would offer little protection to riders from being catapulted off the front of the car in the event of collision. It was decided to modify the original standard gauge, already cut down front handrail to a common Fairmont configuration which would provide the normal level of protection found on other open cars. |

Once the frame was painted, the engine was installed |
|

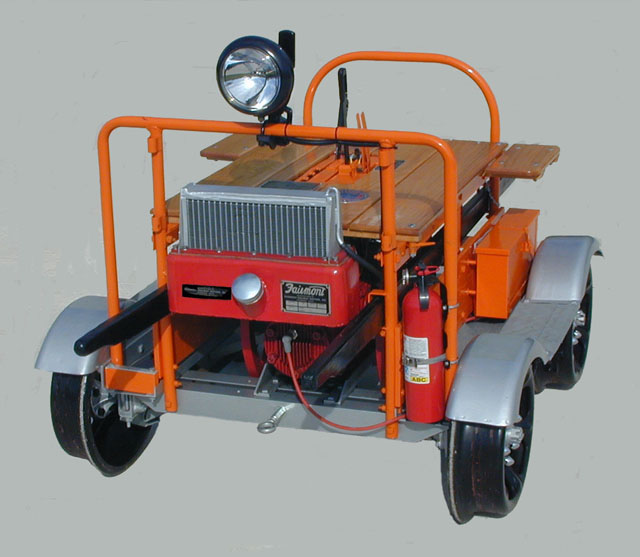
Meter Gauge (39 3/8") M9 as illustrated in 1940's Fairmont catalogue |
The engine
box and cover were the next items to come under scrutiny. The original
side panels appeared to be oak. The orange paint was almost completely
faded. The Home Depot turned out to be an excellent source of high quality
red oak.
A planked style cover as illustrated below was easily fabricated and finished with Minwax clear spar urethane. The side panels were drilled using the originals as patterns and then primed with wood primer. All parts were individually painted with orange Imron. Assembly was easy and the car seemed near completion. New data plates are available from Dick Ray through NARCOA or from Les King. In order to comply with NARCOA rules some additional equipment was needed. A headlight, tail light and brake activated stop lights were required. A 12 volt single wire alternator (meaning the voltage regulator is contained in the alternator) was ordered from J.C. Whitney. The Part Number is 14zx6048x. A support bracket was fabricated and the adjustment arm salvaged from an auto junk yard. |
|
| An
old Fairmont headlight was in the junk box, but the bulb was smashed. A
GE 4436 round sealed beam 35 watt bulb from NAPA worked perfectly. The
headlight mounting bracket is original Fairmont. The castings were loaned
to Les King so that he could offer an exact replica in his product line.
A visible, non original electrical system control panel was not desired, so one was built inside the tool box used to house the ignition coil. A motorcycle battery that fit in the box and left room for a small switch panel was found. A couple of switches (one for the battery and the other for the lights) and an amp meter from an auto store were installed in a plastic box from Radio Shack. Since the electrical system was 12 volts and the coil 6 volts, a NAPA p/n ICR 23 coil resistor was used to drop the voltage. The tail/brake light came from the auto store. A NAPA p/n SL128 stoplight switch was used that is easily mounted and has a lever actuator on top that connects to the spring hole on the brake lever with a small chain. |
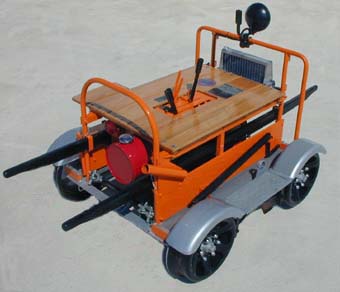 |
|
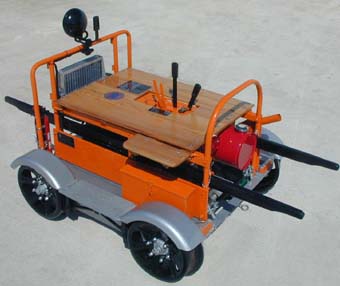 |
The
old fuel tank was cleaned by shaking it vigorously with chain and later
clean gravel inside. It cleaned up reasonably well and was re-used. The
round style 3 1/2 gallon tank complete with bright red powder coating is
also available as new production from Les King.
A new fuel strainer bowl and shut off from NAPA (p/n 730-2357) was installed. The tank has two fittings in the bottom. The one not used for the strainer bowl was fitted with an aircraft style fuel tank quick drain to remove water and sediment. A new vented fuel cap (NAPA p/n 703-1220) was added. Be sure not to mix up the fuel cap (vented) with the hopper cap (non-vented) - they look alike. Towing eyes were added to the front and rear of the car and a tow bar that is adjustable in length and fits inside the engine box was added to comply with NARCOA rules. A first aid kit that fits between the coil box and side panel was installed as well as a fire extinguisher. A new engine crank was purchased from Les King. |
|
| It
was time to see if the car would run. All my previous experience had been
with Onan engines so the OD-B promised to be a new adventure. The fine
articles written by Dick
Ray and available on the NARCOA web
site were invaluable. The coil points and timer were cleaned and set
up as described in the articles. Finally everything was ready and to my
amazement, the engine started on the first crank pull and ran fine.
The engine timing was set up per the Fairmont M9 manual and the Dick Ray timing article.The "one wire" alternator was checked for proper charging. A problem was discovered; the alternator was overcharging the battery. The alternator was replaced by J.C. Whitney under warranty and the new one worked fine. I discovered that the hopper filler neck leaked quite badly as soon as the water temperature rose after several minutes of operation. A new filler cap and gasket was installed, but the leak continued. A careful examination of the filler neck showed some pitting where the cap gasket contacted the neck. A new filler neck was obtained from Les King and soldered in place by a local radiator shop. Problem solved - no more leaks. |

View of the engine box with cover removed. Note the positioning of the alternator. |
|
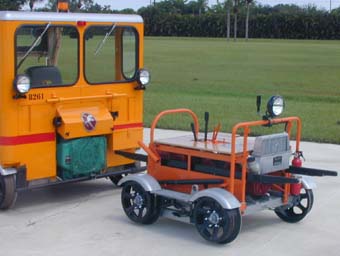
This photo of the M9 next to an MT19 gives an idea of the small size of the car |
Now all that
was needed was a place to put the car back on 3' gauge track and do a test
run. Thanks to the courtesy of Mark Milbourne of the Doe
River Gorge near Elizabethton, TN, an invitation was extended to run
on an original part of the famous Eastern Tennessee and Western North Carolina
Railroad. The Doe River Gorge,
a Christian retreat, has acquired the land surrounding the railroad right-of-way
through the river gorge. They have a 3' MT19 as well as a beautiful plantation
style steam locomotive and a number of cars.
This particular 2 1/2 mile section of track was probably the most scenic section of the entire line and includes the famous curve around Pardee Point. It miraculously survives in a very remote section of the river gorge that is very difficult to reach other than via the railroad right-of-way. November 16th 2000 was the big day, and inspite of the 40 degree weather, the car was set on at the retreat headquarters. The line immediately enters a curved tunnel and comes out in the pristine wilderness of the gorge. It was an unbelievable experience as the line is almost unchanged from the last day of operation in 1950. |
|
| As we proceeded,
I became concerned about the possibility of breaking down and having to
push the car back to the set on point. Turns out my fears were unfounded
as the line climbs a 2 to 3% grade and we could have coasted back if needed.
The car ran perfectly and the run provided a good opportunity to become
familiar with two cycle operation without the pressure of being on a regular
run with other cars.
The next day, accompanied by my wife and Mark, it was off to the Tweetsie Railroad near Blowing Rock, NC. We had received permission to run on the 3 mile line which is a tourist attraction and recreates the E.T.& W.N.C. railroad. This run was a good test as it has a 5 1/2% grade. This grade, although steeper than the Cumbres Summit climb found in Colorado is at a much lower elevation and while steep, is not as difficult to climb. I had to tighten the belt adjustment to get up the hill. But after some practice, the steep grade was climbed without any trouble. Coming down the hill presented a different problem as quite a bit of manual braking was needed. I later discovered that the trick to descending a steep hill in a 2 cycle car is to keep the belt engaged and turn off the ignition. The throttle may be opened to increase compression braking, but should not be fully closed with the ignition off or the engine may be damaged by lack of lubrication. As soon as engine power is needed, the ignition switch is turned on and the engine will (should) resume normal operation. Another lesson learned is that if a problem occurred, it was because the Fairmont instruction manual was not being followed EXACTLY. If the car is set up mechanically and operated according to the Fairmont instructions, it will operate as advertised - every time. |
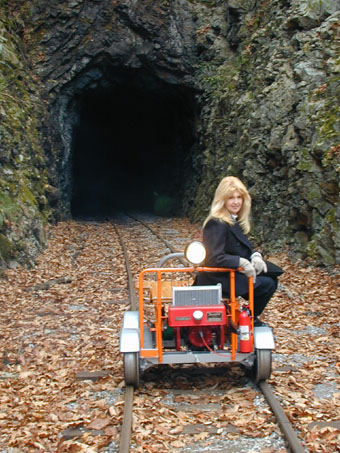
Wife Renda, and the M9 outside tunnel #3 in the Doe River Gorge. |
|

Approaching the passenger station on the Tweetsie R.R. |
Problems are
usually the result of some non original modification or non standard operating
procedure. If it doesn't work, stop, re-read the instructions, follow them
and try again.
I found operation of the 2 cycle car to be much more challenging and fun than the Onan powered car. Advice from "old timers" can be helpful and a real sense of satisfaction is gained when the car performs exactly as designed. Expect a learning curve. Don't put yourself in a position of being embarrassed if you are carrying friends until you gain some experience. If you end up on the wrong end of a towbar, carry a copy of the Dick Ray articles, most of the time, you will be able to troubleshoot the problem with these well written instructions After returning home from the initial run, it was decided that the original flat wooden seats would be very uncomfortable on a long trip. A quickly removable mounting board was constructed with a pair of tractor seats from Northern Hydraulics added to make longer trips more comfortable. The seat modification is quite comfortable, did not require drilling of any holes in the motorcar and can be completely removed in a few seconds without tools to return the car to factory configuration. They actually look like something Fairmont might have installed. MOW - Motorcar Operators West, the organization that sponsors the Colorado narrow gauge runs, requires a spark arrestor on all cars due to extreme fire hazards in the West. |
|
| This
car originally had a side exhaust which did not leave room enough for a
spark arrestor in the narrow frame. In order to have sufficient room for
the arrestor, a rear exhaust would be needed. With the help of "Smitty",
I was able to find a suitable spark arrestor for use on the 2 cycle engine.
The spark arrestor is made by Cobra in Anaheim, CA. It is a model SPK-9190,
is U.S. Forestry approved, fits on the end of a 2 1/4" tailpipe and is
available in motorcycle shops for about $65. The exhaust elbow attached
to the engine is new production from Les King.
I took the car to a muffler shop to have a custom length of exhaust made of 2 1/4" O.D. pipe that was flared in their shop to exactly fit over the 2 1/2" diameter elbow. The pipe was bent in their shops equipment to give sufficient ground clearance and fit in the limited space available. One flexible exhaust hanger (available in any auto parts store) is attached just forward of the arrestor to support the aft end of the exhaust pipe. Cost for the custom pipe - $50. A re-usable wooden crate with portable ramps was fabricated and the motorcar shipped via truck freight to Durango, Colorado for the 2001 narrow gauge runs. |
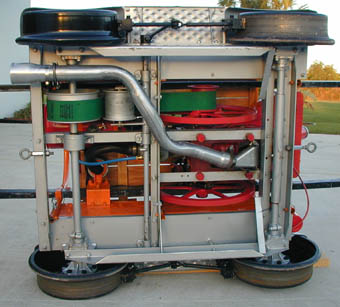
Spark arrestor and exhaust installation |
|

M9 with removable seats in the yard at Chama, NM ready for the long climb to Cumbres Summit at 10,015 feet above sea level. |
Set on for
the Durango & Silverton Narrow
Gauge Railroad run was on June 4. The run began the next morning when
we departed the Durango depot at 0630 for Silverton. The day dawned with
beautiful weather and a temperature of 34 degrees. By afternoon the
thermometer had climbed into the 70's. Our first potty stop was at Hermosa
- about 10 miles down the line. Next we proceeded to Rockwood and entered
the "High Line". This part of the railroad is constructed on a narrow shelf
of red granite overlooking the Animas River. We then continued on to Silverton
where we had sufficient time to enjoy a leisurely lunch before the return
trip. I learned a great deal about 2 cycle operation during the 90 mile
run. The car ran well with no problems. The 3 1/2 gallon fuel tank held
sufficient fuel for the round trip and the cooling system did not require
any additional water.
The next day we proceeded to Chama, N.M. for a 90 mile run on the Cumbres and Toltec Scenic Railroad. The big challenge on the C. & T. S. RR is the 14 miles of 4% ruling grade, with some places even steeper, between 7,863 feet at Chama, NM and 10,015 foot Cumbres Summit. I was concerned that the 5 hp OD-B engine would not make it up the long grade at such high elevations. The little car struggled along at a slow speed, but finally reached the Summit to my great relief. Continuing East from Cumbres Summit, the grade is 1.42% descending so we could relax and enjoy the fantastic scenery. There are two tunnels and several trestles to cross. The railroad runs along the New Mexico and Colorado borders and crosses back and forth eleven times. No break downs occurred and a good time was enjoyed by all. The little M9 spent the winter of 2001 - 2002 on display in the Durango & Silverton Narrow Gauge Railroad Museum in Durango, Colorado awaiting the next run. |
|
| The
2002 season saw the car headed North to Alaska to participate in the Motorcar
Operators West excursion on the White
Pass and Yukon Railroad in August, 2002.
The WP&Y was constructed during the 1898 Klondike gold rush to allow the "stampeders" an easier way than climbing the mountains on foot, to reach the gold fields of the Yukon from the Pacific Coast. We ran about 250 miles on this excursion reaching Carcross in the Yukon Territory from Skagway, Alaska. This has to be one of if not the most scenic run in the world. In the first 20 miles the line climbs nearly three thousand feet to cross the Pacific Coast mountain range at White Pass which is the border between Alaska and British Columbia. The grade approaches 4% in several locations, but unlike the equivalent grade crossing the Cumbres Summit at over 10,000' on the Cumbres and Toltec, the lower elevation made it much easier for the 5 hp engine, and the car was able to keep up with the Onan powered cars on the hill. After crossing the pass, trains proceed to Fraser B.C. to clear customs and then descend slightly to Bennett at the North end of Lake Bennett which forms the headwaters of the Yukon River. The "stampeders" followed this river to the Klondike gold fields. The rail line follows the shores of Lake Bennett for 27 miles through a beautiful valley carved out by glaciers. The lake is crystal clear and no roads or other civilization is seen until reaching Carcross, Yukon Territory at the North end of the lake. What's next? Well... let's see.. Still haven't done the East Broad Top in Pennsylvania. Keith Mackey |
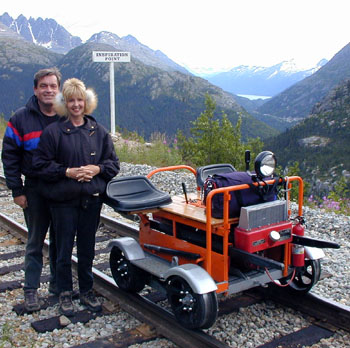
Yours truly and wife in 40 degree weather August 2nd at inspiration point overlooking Skagway harbor on the climb to White Pass summit. |
|
